Whether you have already decided to build your pond with a preformed pond shell or you just want to know if it is the right choice, this article will provide the information you need. It starts with a short description of the pond shell and then gives an account of its step-by-step installation, including the site selection. If you want to skip directly to the information you need, you can do so here below.
Installation Guidance

What is a preformed pond shell?
The preformed pond shell is made of polyethylene or fiberglass-reinforced polyester. There are many shapes and sizes, but they tend to be shallow, usually limited to 2 or at most 3 feet with steep sides. You can, of course, order a larger and deeper pond shell tailormade in fiberglass at a specialized shop. However, for truly large ponds, the transport costs may become excessive to the extent that you may be better off with a pond liner.
Pond shells retail at under 100 dollars for a small basin (~100 gallons) up to several thousands of dollars for a larger basin of 2000 gallons or more. Most pond shells come with shelves at different depth levels that provide for the installation of different types of aquatic plants. You can also create your own levels by hanging containers (plant pots) on the side of the pond.
Make sure that your PE pond shell is UV resistant because it will eventually become brittle even when only briefly exposed to the sun each day. This also happens below the water table because UV radiation penetrates the water layer. Most pond shells are non-toxic to fish and plants, but it is useful to insist on this point before ordering.
Provided that your pond shell is of good quality, UV resistant, and correctly installed, it is a sturdy solution that will hold for many years.
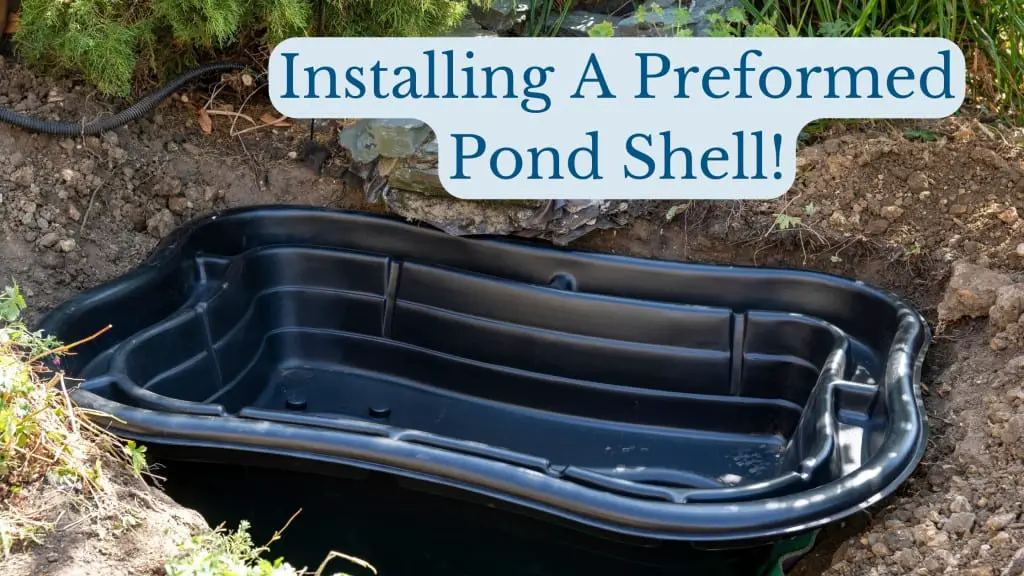
How to install a preformed pond shell
Prior to the actual installation of a preformed pond shell, you need to select a suitable location for your pond and realize the necessary preparations.

Site selection and site preparation
The ideal location for a pond is, of course, a flat area. However, one of the most important factors to consider for the location of the pond is to prevent any inflow of surface water and, worse, inundation of your pond during a rainstorm. You should avoid any low area that tends to flood during heavy rain and surface drainage pathways. Even if your garden seems flat, such drainage patterns may likely be present.
If you suspect a shallow groundwater table above the bottom level of the pond, it is recommended to look for a better location. If this is not possible you may wait for a lower water table (summer) or to temporarily lower the water table by digging a dewatering well (one or more) next to your intended pond area to pump out the water. You need to pump the well until you fill the shell with water because an empty shell will float on the groundwater. If the groundwater table is year-round high, you may construct a pond by just digging, so without pond shell or any other means.
If the terrain is somewhat sloping, you must prepare a level platform (terrace) before you start excavating for the pond itself. If you construct a terrace, it is recommended that you remove the arable topsoil and grass sods or plants first (about 3/4 foot with the darker soil) and keep it separate for later replacement (or use elsewhere) when the pond is installed.
You then dig a flat terrace with the subsoil, either by exclusively excavating, or by excavating the high ground and backfilling the low. If you backfill the low, you should compact it as good as you can because a poor compaction will surely cause problems with uneven settlement and a sloping pond shell later.
Be aware that a large pond on a sloping terrain, requires significant preparatory earthworks. We have a detailed article on the main factors to be considered for the best location of a garden pond (visibility, sun, wind, trees, flatland, underground utility lines, electricity, drainage and managing the pond water level). You can find this information here.
The installation of your preformed pond shell
Once you have identified the best location, you proceed with the installation of the preformed shell with the following steps:
- Place the pond shell on the surface in the exact position and mark an excavation slightly wider than the pond outline with a spade or sticks or anything that stays in place when you start digging.
- Start digging within the outline, taking care to separate the rootzone soil and plants from the deeper layer if you haven’t done so already for creating the terrace.
- Continue digging till you are some inches deeper than the final pond bottom level. If you shell has shelves with reduced depths, it is convenient for the installation to reduce the depth of excavation below the shelves.
- Remove any stones and roots from the bottom and the sides of the excavation that may compromise the pond shell or cause uneven settling.
- Fill the bottom of the excavation with some inches of construction sand up to the final bottom level after levelling and compaction.
- Place the pond shell in the hole taking care that the sides are perfectly level in all directions and about 4 inches above ground level anywhere around the pond (to prevent unwanted inflow). If the sides are not level, take out the shell and adjust the compacted sand as needed.
- Increase the weight of the pond (with sandbags, large stones, and/or a layer of water) as needed to prevent uplift during back fill and compaction.
- Proceed to backfill the space between the pond wall and the excavation till ground level, with the material previously excavated from the deeper layer, filtering for (sharp) stones and organic material. It is important to compact the backfill material meticulously even under the shelves of the pond shell. Do not fill more than 1 foot of lose material at a time before compaction and use a punner or some heavy hand tool (hammerhead) to compact. Take care not to overdo it to the extent that the empty shell moves up from its level position.
- Construct and compact a small embankment (a minimum 4 inches) sloping away from the rim of the pond. If there is a height difference around the pond, the embankment will be higher and larger for the lower terrain. If you had removed the grass sods from the hole previously, you may replace them on the side slope. You may also want to conceal the rim of the pond by placing stones, cobblestones, brickwork, tiles, and/or grasses, creeping plants, and low bushes.
- Fill the pond with gravel, cobbles, and some larger stones at the different levels as provided by the shell. Install your pump and associated accessories (filter, fountain, etc.) and fill the pond shell with water. Harvested rainwater is preferable but you can also use tap water because any chlorine will disappear in a matter of days. If you use water from a borehole, you may check it beforehand for the presence of nutrients (nitrate and phosphorus) and possible toxic substances.
- While filling the pond, you can place the water plants gradually. If you plan to hang baskets on the side of the pool, you can do it anytime. Take care that the level of the baskets corresponds to the final height of the plant.
- For the introduction of fish, it is recommended to wait at least some days for conditions to be stabilized.

Before You Go!
Unless your pond shell is truly large, the installation of a pond shell is a doable project for one or two able hands that like to work out in the garden (instead of the gym). If you purchase a good quality shell (UV resistance and nontoxic), and you follow the steps here presented, the installation should succeed.
If needed, most resellers of pond shells will provide a contact with a qualified installer or organize this service for you for a cost.
Verify beforehand if you require any authorization for your pond
Before you embark on a pond project, verifying if authorization from any organization is required is highly recommended. This holds particularly for larger projects and if you plan to excavate below groundwater level.
You should also inquire if it is allowed to drain excess pond water on the municipal sewer system. The relevant authorities will likely be your municipality and/or a water management authority and municipal wastewater treatment service provider. If you rent your home, you should contact your landlord, and if you happen to be part of a collective garden or a garden community, you may communicate with the community or their representatives before you start your project.